
WebSocket 是一种可实现客户端和服务器之间实时双向数据传输的通信协议。2008年,出现初期概念与需求。2011年实现正式标准化 RFC 6455。2011年及以后快速发展、广泛应用到实时应用场景。WebSocket 的优点是实时、低时延和低带宽。
1. WebSocket 如何工作
WebSocket 通过 HTTP 进行 upgrade 握手,将通信协议升级为 ws://(wss://),此后所有通信均通过 TCP 进行。
GET /api/v1/ws?session_id=123456
Origin: https://abc.test.xx
Upgrade: websocket
Connection: Upgrade
Sec-WebSocket-Key: uRA2WL4ufOJbg5WRI8LGuw==
Sec-WebSocket-Version: 13
Host: abc.test.xx
HTTP/1.1 101 Switching Protocols
Server: XXX
Date: Thu, 05 Sep 2024 00:19:27 GMT
Connection: upgrade
Upgrade: websocket
Sec-WebSocket-Accept: kpStiDhj1d43uiPN/tKkDGQTgEE=
Sec-WebSocket-Accept 的计算方法:
- 将 Sec-WebSocket-Key 跟 258EAFA5-E914-47DA-95CA-C5AB0DC85B11 拼接;
- 通过 SHA1 计算出摘要,并转成 base64 字符串。
2. 网络层适配
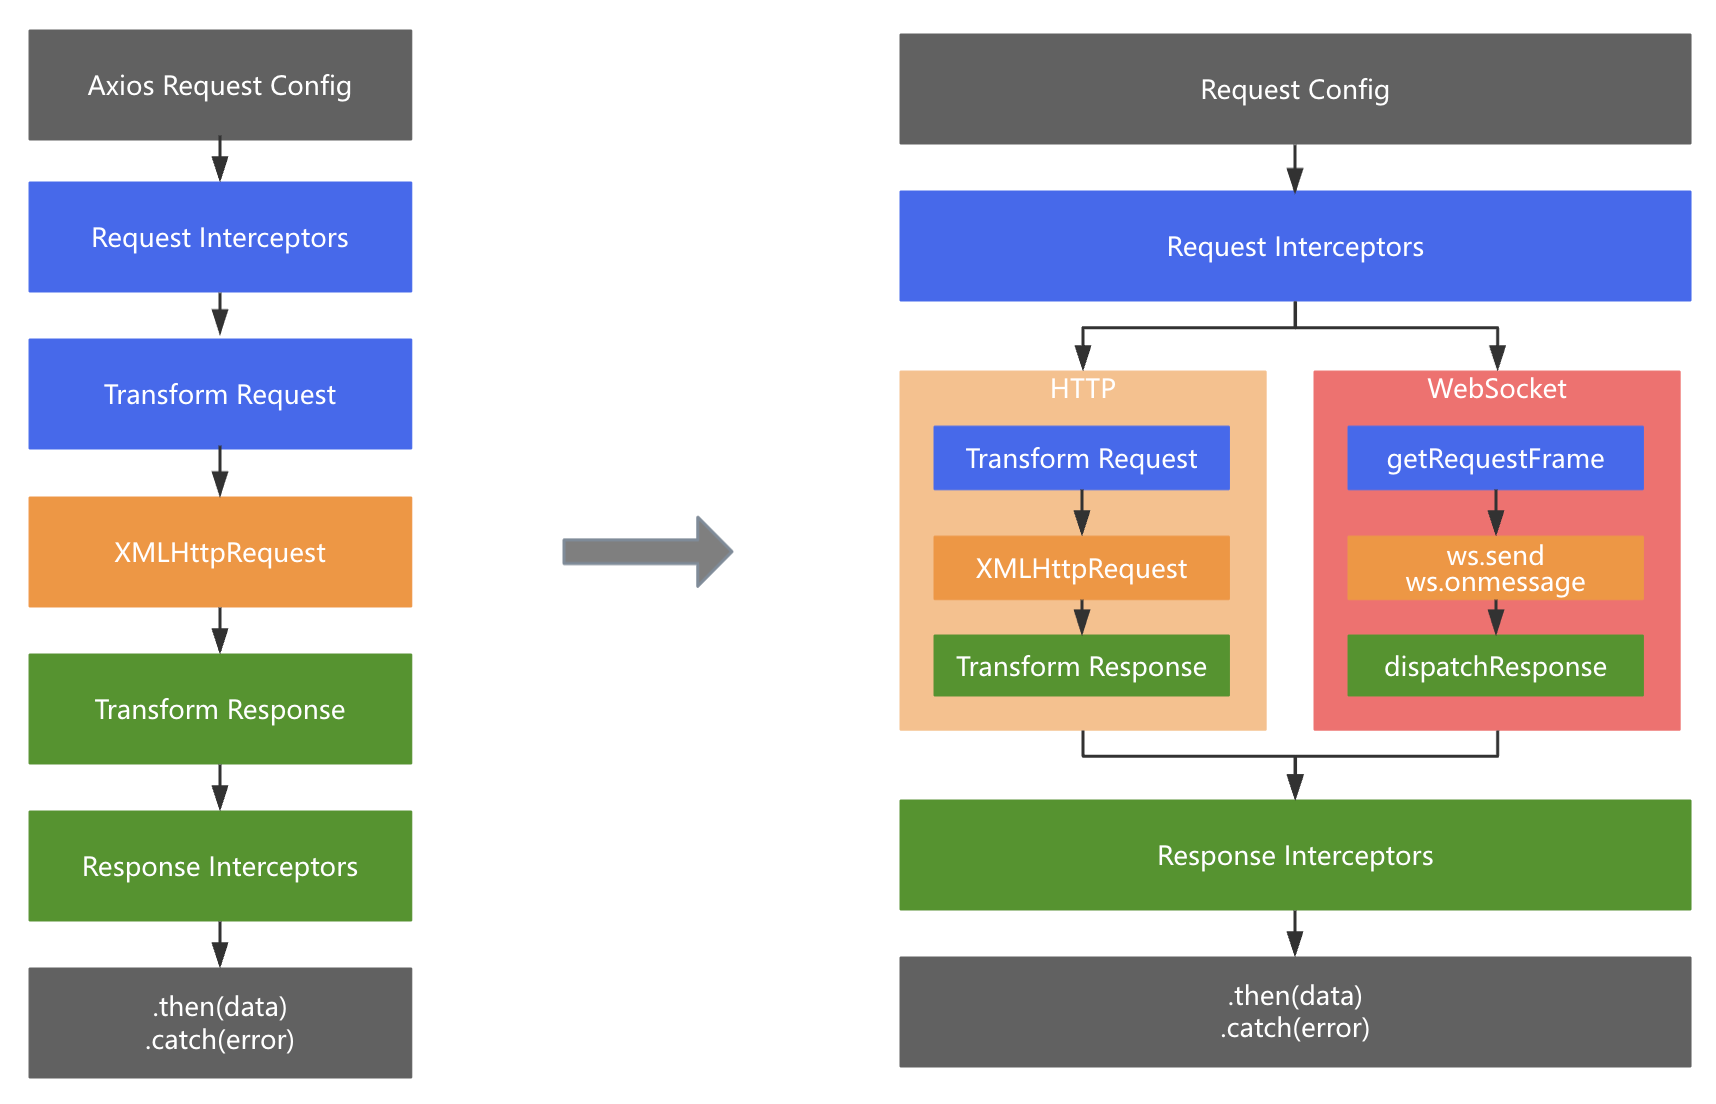
项目里已经使用 Axios 处理 HTTP 请求,接入 WebSocket 最好复用已有的 Interceptor 和 Callback 逻辑,降低开发和维护成本。
2.1 WebSocket 消息协议格式
- seqId:请求消息 ID,对应的响应消息 ID 与之相同
- msgType:消息类型,包括普通消息、ping 和 pong
- content:包含请求 wsProxyHttpRequest 和响应 wsProxyHttpResponse
{
  "seqId": 1725240629225,
  "msgType": 2,
  "content": {
    "wsProxyHttpRequest": {
      "path": "/api/v2/solution",
      "method": "GET",
      "query": "intent_id=3226&session_id=123456"
    }
  }
}
{
  "seqId": 1725240629225,
  "msgType": 2,
  "content": {
    "wsProxyHttpResponse": {
      "statusCode": 200,
      "response": "{\"code\":0,\"msg\":\"success\",\"data\":{}}",
      "responseHeaders": {
        "Trace-Id": "1a7cee4721192633ecc8e0475fd43602",
        "Content-Type": "application/json; charset=utf-8"
      }
    }
  }
}
2.2 链式调用
Axios 实现:
/**
 * Dispatch a request "version": "0.19.2"
 * @param {Object} config The config specific for this request (merged with this.defaults)
 */
Axios.prototype.request = function request(config) {
  // Allow for axios('example/url'[, config]) a la fetch API
  if (typeof config === "string") {
    config = arguments[1] || {};
    config.url = arguments[0];
  } else {
    config = config || {};
  }

  config = mergeConfig(this.defaults, config);

  // Set config.method
  if (config.method) {
    config.method = config.method.toLowerCase();
  } else if (this.defaults.method) {
    config.method = this.defaults.method.toLowerCase();
  } else {
    config.method = "get";
  }

  // Hook up interceptors middleware
  var chain = [dispatchRequest, undefined];
  var promise = Promise.resolve(config);

  this.interceptors.request.forEach(function unshiftRequestInterceptors(
    interceptor
  ) {
    chain.unshift(interceptor.fulfilled, interceptor.rejected);
  });

  this.interceptors.response.forEach(function pushResponseInterceptors(
    interceptor
  ) {
    chain.push(interceptor.fulfilled, interceptor.rejected);
  });

  while (chain.length) {
    promise = promise.then(chain.shift(), chain.shift());
  }

  return promise;
};
Axios 原型上的 Request 函数实际上是调用 Axios.get、Axios.post 发送 HTTP 请求时都会调用的函数。函数上面部分处理请求的 Config 可以略过,重点看下面的部分。
- 首先初始了一个 chain,也就是
调用链。有 dispatchRequest 和 undefined。dispatchRequest 就是实际发送请求的函数。 - 跟着初始化了一个 resolve 请求的 Config 的 Promise。
- 然后是把请求的拦截器塞到了
调用链的前面,再把响应的拦截器放到了调用链的后面。调用链准备完毕之后,调用 while 循环把调用链用 promise 串起来,最后返回 promise。
借鉴 Axios 调用链 的实现,对 WebSocket 的请求和响应也做类似的处理。
async function send(requestParams, successCallback, errorCallback, finalCallback) {
  if (this.isWebSocketOpen) {
    const { seqId, request, params } = requestParams;

    let modifiedConfig = getRequestConfig(apiConfig, params);
    for (let index = 0; index < this.requestInterceptors.length; index++) {
      modifiedConfig = await this.requestInterceptors[index](modifiedConfig);
    }
    const requestFrame = getRequestFrame(seqId, modifiedConfig);

    try {
      const buffer = getRequestBuffer(requestFrame);
      // 回调和超时控制
      this.requestInfoMap.set(seqId, {
        config: modifiedConfig,
        callbacks: [successCallback, errorCallback, finalCallback],
        timer: needClearSetTimeout(() => {
          errorCallback();
          finalCallback();
          const requestInfo = this.requestInfoMap.get(seqId);
          if (requestInfo) {
            requestInfo.isTimedOut = true;
          }
        }, REQUEST_TIMEOUT),
        isTimedOut: false,
      });

      this.socket.send(
        buffer.buffer.slice(buffer.byteOffset, buffer.byteOffset + buffer.length)
      );
    } catch (e) {}
  } else {
    this.reconnect();
  }
}
export function dispatchResponse(
  responseContent: ResponseContent,
  config: RequestConfig,
  devInfo: Record<string, any>
) {
  try {
    const res = JSON.parse(responseContent.response);
    const status = responseContent.statusCode;
    if (status >= 200 && status < 300) {
      if (devInfo.wsAckTime && res.time_consuming) {
        devInfo.wsNetworkTime = devInfo.wsAckTime - res.time_consuming;
      }

      return Promise.resolve({
        status,
        data: res,
        config,
        devInfo,
      });
    } else {
      return Promise.reject({
        status,
        config,
        response: {
          status,
          data: res,
        },
      });
    }
  } catch (error) {
    return Promise.reject(error);
  }
}
handleResponse(
    responseContent: ResponseContent,
    config: RequestConfig,
    devInfo: Record<string, any>
) {
  const responseInterceptorsChain = [] as any[];
  this.responseInterceptors.forEach((interceptor) => {
    responseInterceptorsChain.push(
      interceptor.fulfilled,
      interceptor.rejected
    );
  });

  const len = responseInterceptorsChain.length;
  let promise = dispatchResponse(responseContent, config, devInfo);
  let i = 0;

  while (i < len) {
    promise = promise.then(
      responseInterceptorsChain[i++],
      responseInterceptorsChain[i++]
    );
  }

  return promise;
}
this.socket.onmessage = (event) => {
  const rawData = event.data;

  let responseObject;
  try {
    responseObject = getResponseObject(rawData, true);
  } catch (error) {
    return;
  }

  // 处理 pong 则 return

  const seqId = responseObject.seqId;
  if (this.checkResponseTimeout(seqId)) {
    return;
  }
  const requestInfo = this.requestInfoMap.get(seqId);
  store.sessionStore.seqIdToAckMap.delete(seqId);

  if (requestInfo?.callbacks?.length) {
    const [successCallback, errorCallback, finalCallback] =
      requestInfo.callbacks;

    this.handleResponse(
      responseObject.content?.wsProxyHttpResponse || {},
      requestInfo?.config
    )
      .then(successCallback, errorCallback)
      .finally(finalCallback);

    this.requestInfoMap.delete(seqId);
  }
};
2.3 重连设计
WebSocket 的连接由 connect 开始,由于各种原因 WebSocket 可能断开连接,需要重连。这里添加了重连次数的限制,超过限制则不再重连。
对于交互流程是一来一回的简单业务,直接使用了原生的 WebSocket API,结合采用了 Protocol Buffers (简称PB) 这种二进制的序列化协议。
connect(openCallback?: Function) {
  if (this.numberOfConnectLeft <= 0) {
    return;
  }

  this.socket = new WebSocket(this.url);
  // An ArrayBuffer would have to be fully read before it
  // could be used, and all of the data would have to be
  // in memory at the same time. In contrast, a Blob can
  // be read as a stream, avoiding having to have all
  // the data in memory before you can do anything with
  // it (or at all).
  this.socket.binaryType = 'arraybuffer';

  this.closeTimer = needClearSetTimeout(() => {
    this.close();
    this.isEnabled = false;
  }, REQUEST_TIMEOUT) as unknown as number;

  this.socket.onopen = () => {
    if (!this.isEnabled) {
      return;
    }
    if (this.closeTimer) {
      clearTimeout(this.closeTimer);
    }
    if (this.reconnectTimer) {
      clearTimeout(this.reconnectTimer);
    }

    openCallback?.();
    this.ping();
  };

  this.socket.onmessage = (event) => {
    // handle response
  };

  this.socket.onclose = (e) => {
    this.reconnect();
  };

  this.socket.onerror = (e) => {
    this.reconnect();
  };

  this.numberOfConnectLeft--;
}
除了限制链接次数,对 WebSocket 的连接耗时也做了限制,超时连接不上则直接禁用。连接成功后就开始发 ping 消息。ping 后超时未收到 pong 的话,就会重连。WebSocket 是有自己的 ping pong 消息协议的,为什么我们自己还要实现 ping pong 呢?原因是因为客户端和服务端之间隔了个网关,需要用业务的 ping pong 保证请求链路是通的。
说完 ping pong,看下重连,在 WebSocket 状态未打开、有报错和被动关闭的时候,都需要重连。
async reconnect() {
  const { isConnected } = await fetchNetworkInfo();
  if (
    !this.isEnabled ||
    !isConnected ||
    this.isReconnectScheduled ||
    this.isWebSocketConnecting
  ) {
    return;
  }

  this.isReconnectScheduled = true;

  this.reconnectTimer = SetTimeout(() => {
    this.connect(tryToPullLostWSMessage);
    this.isReconnectScheduled = false;
    this.reconnectTimeout += RECONNECT_TIMEOUT_INCREASE_UNIT;
  }, this.reconnectTimeout);
}
客户端通常会一起收到 error 和 close 事件,所以重连方法有必要设置一个锁,如果已经存在一个重连的定时器,那就不要再创建了。
另外在因连接超时被禁用、断网和 WebSocket 正在连接中的时候,也不需要重连了。